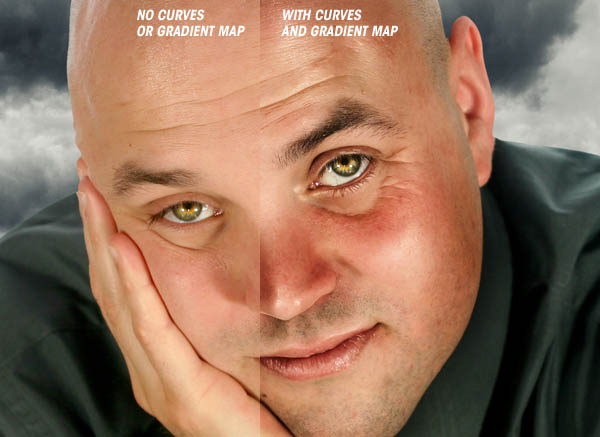
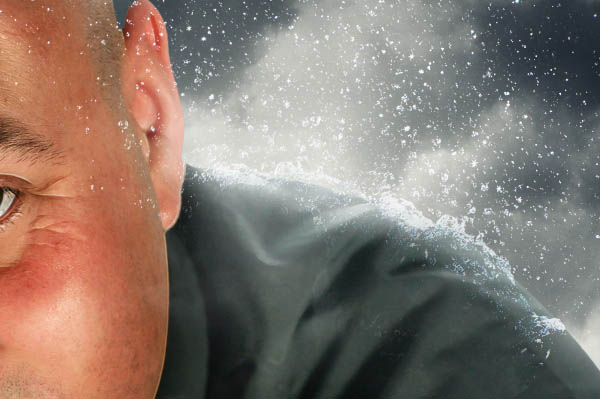
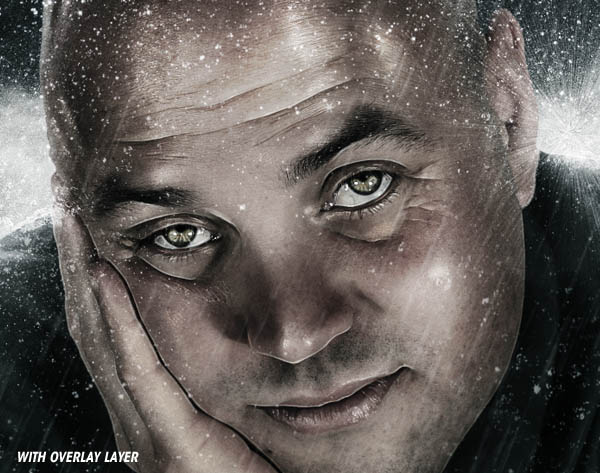
Final Product What You'll Be Creating

Update: This tutorial was originally published on Psdtuts in April 2009.
Video Tutorial
Our video editor Gavin Steele has created this video tutorial to compliment this text + image tutorial.Asset Preparation
The images I’ve used are: The man, the cloud, the water drops 1, and water drops 2. As always feel free to use your own images, however you may need to tweak the settings of any of the steps to get the right effect with different assets.Step 1
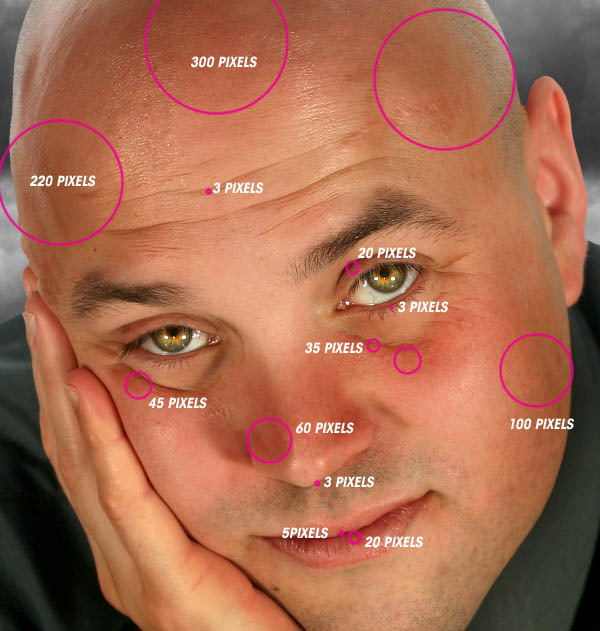
Open the man image from iStockphoto and separate him from the background. Use whichever method you’re comfortable with, I would usually use the Pen Tool, but I’ll be honest, as he’s got no hair to worry about and the background is white I kinda cheated. I used the, ahem, Magic Wand Tool to select the white. I then Feathered the selection by 1 pixel (Select > Feather), expanded it by 2 pixels (Select > Modify > Expand) and hit delete 2-3 times until the white halo disappeared. Call this layer “MAN.” Select the Dodge Tool, set the Range to Highlights and the Exposure to 15% and run it over the Iris a couple of times. This should bring the eyes out a bit.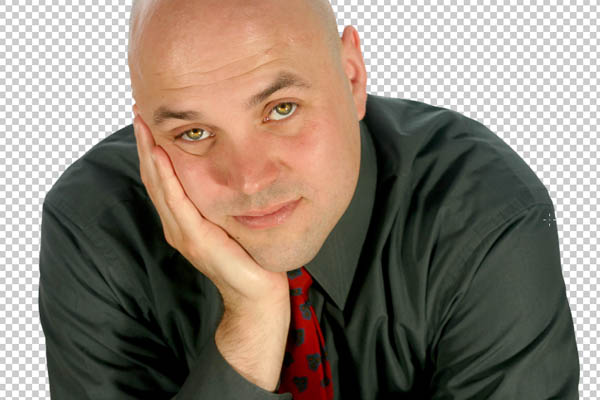
Step 2
Open up the cloud image from sxc.hu and import it into the document underneath the “MAN” layer. Resize it to about 130% and drag (Use the Select Tool, hold Alt and simply drag the cloud around the canvas) three duplicates. Overlap them as in the image below. Then select the eraser, set as a large soft-edged brush, and run it along the hard-edges where the cloud layers meet.
Step 3
Finally, select the Clone Tool, set it to a large (around 400 pixels) soft-edged (0% hardness) brush and clone out the obvious pattern repetitions. Choose multiple source points to avoid more obvious patterns.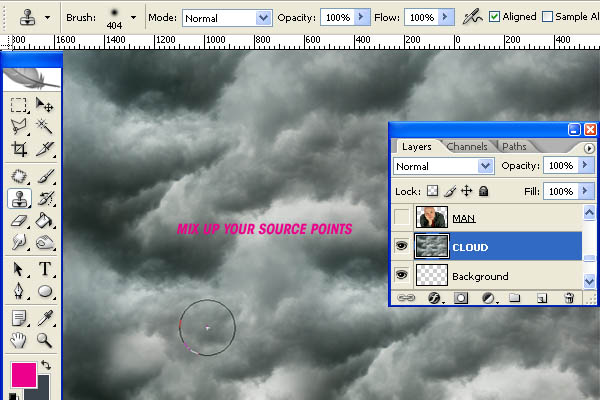
Step 4
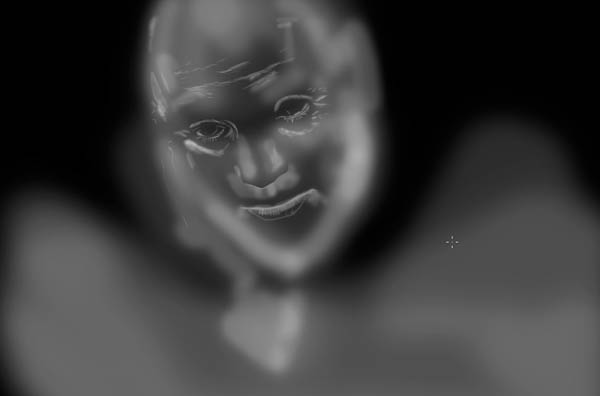
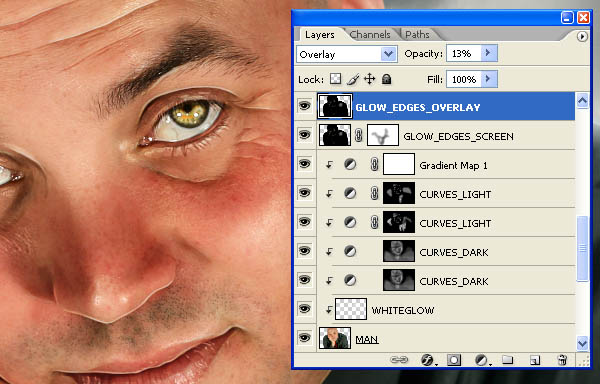
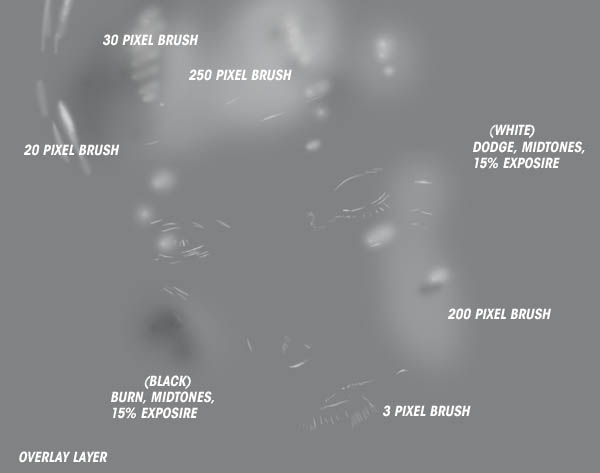
These next few steps are a lot easier if you have access to a graphics tablet, however you can still do it with a mouse. Create a Curves Adjustment Layer just above the “MAN” layer and check the box that’s marked Use Previous Layer to Create a Clipping Mask. Set it up as shown and call it “CURVES_DARK.” Select the “CURVES_DARK” layer mask and fill it with black, this should hide the effects of the Curves.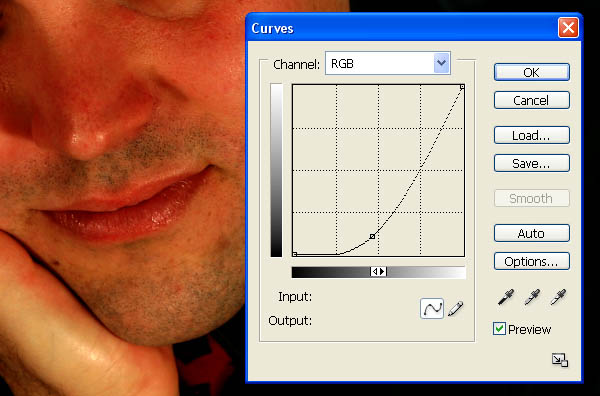

Step 5
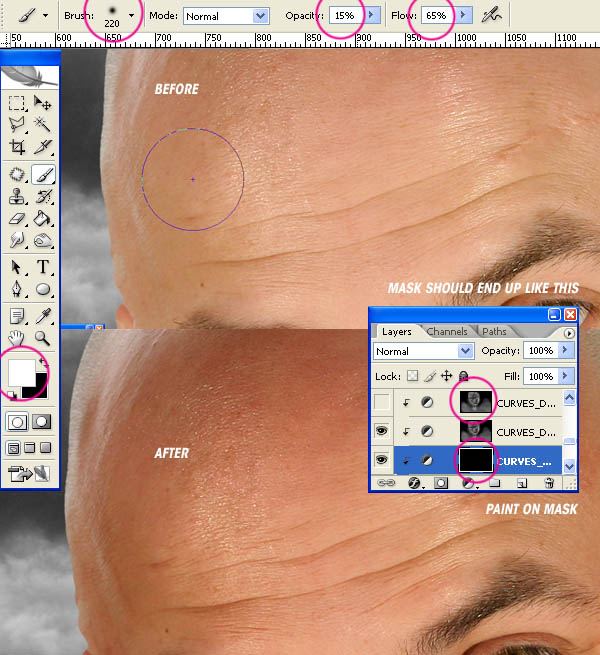
Again, all you peeps with a graphics tablet are going to find this a lot easier. Create another Curves Adjustment Layer above “MAN” and “CURVES_DARK” on the layer palette. Check the box that’s marked Use Previous Layer to Create a Clipping Mask and call it “CURVES_LIGHT.” Pull the upper part of the line upwards to lighten the image. Note: How much you manipulate the Curves layers (including “CURVES_DARK”) affects how much you’ll need to draw on the Layer Mask and how much you’ll need to tweak the overall exposure later on.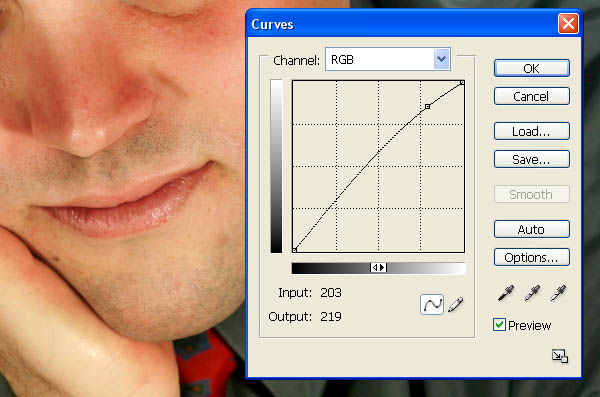
You’re looking to paint over all the areas where there are highlights. To strengthen things like the wrinkles, you should paint light next to the dark but not over it. Paint up to hard-edges with a small brush and then away from it with a large brush to diffuse the transition.
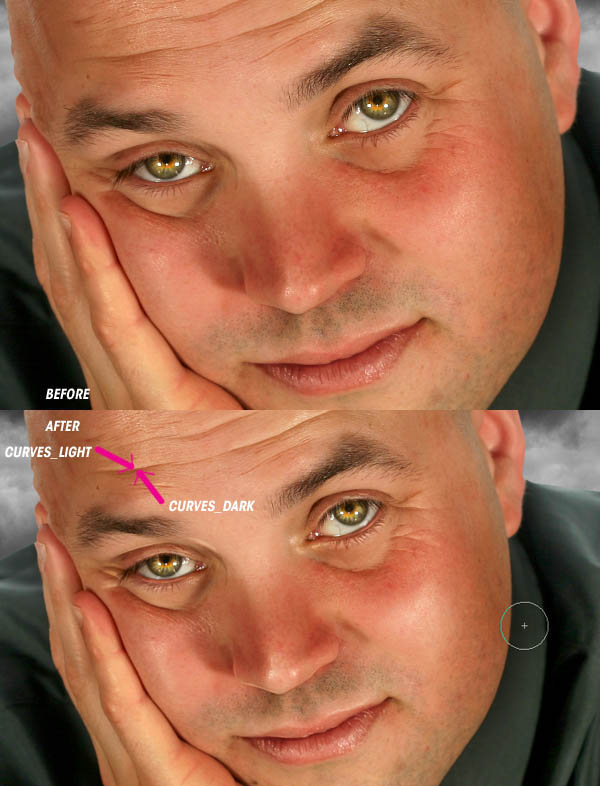
If yours don’t, then select the “CURVES” layer and go to Layer > Create clipping mask. To mask off any areas you require a hard-edge such as the bottom of the nose, simply draw around it using the Pen Tool, turn the path into a selection and paint onto the appropriate Layer Mask.

Step 6
Create a Gradient Map Adjustment Layer above “MAN,” “CURVES_DARK” and “CURVES_LIGHT.” Use the underlying layers as a Clipping Mask. Set the Gradient Map as shown below and then change the Layer Blending Mode to Soft Light and the Opacity to 75%. Now you could tweak the hue/saturation, play with the channel mixer and add a nice studio-esque background and stop there for now. But let’s carry on and add some real drama to this.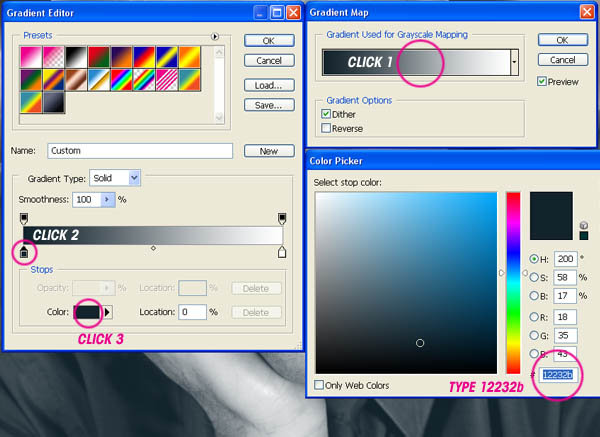
Step 7
Add a Gradient Map Adjustment Layer below “MAN” and above “CLOUD.” Input the darker color as #164370 (a darkish blue) and the lighter color as #e2dc9a (a muddy yellow). OK this, then set the Layer Blending Mode as Soft Light and change the Layer Opacity to 68%. Add a Curves Adjustment Layer directly below the Gradient Map. Adjust as shown and then change the Layer Opacity to 60%. Your Layers palette should that shown below.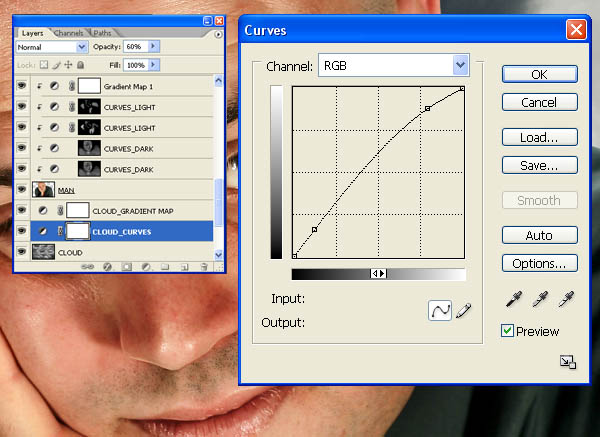
Step 8
Add a new layer directly above “CLOUD” and fill it with 60% black. Set the Blending Mode to Overlay (it should disappear). Select the Burn Tool and set to a big brush (917 diameter, 0% hardness), set the Range to Midtones and the Exposure to around 15%. Then burn around the corners to create a vignette. Call the layer “VIGNETTE” and adjust the Opacity to suit. Mine ended up at 77%.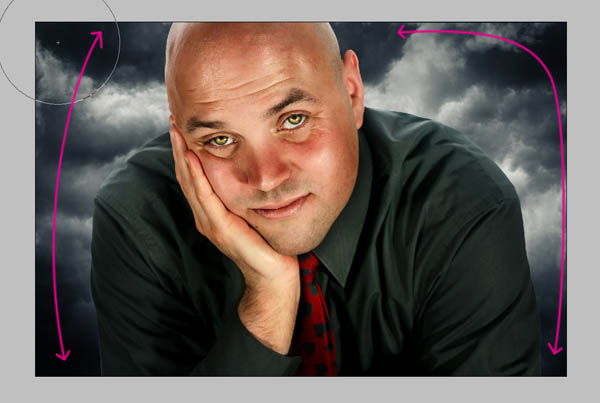
Step 9
Create a new layer directly above “MAN” (using “MAN” as a Clipping Path) and another directly below the “CLOUD_CURVES” and “GRADIENTMAP” layers. Call the new layers “WHITEGLOW.” Select the Paintbrush Tool, load it with white and work on the layers as shown below. Create a soft, white glow below the man to lift him from the background. Then create a white glow above to bleed light from the background over the subject. Follow the pink path as shown, then go over a second time.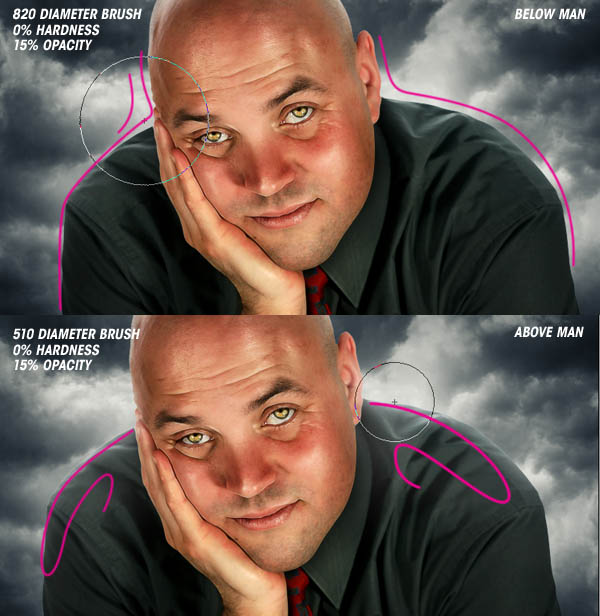
Step 10
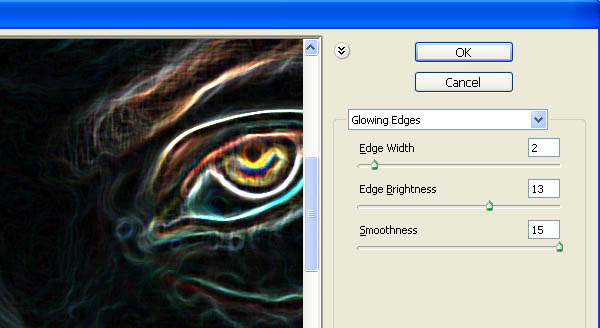
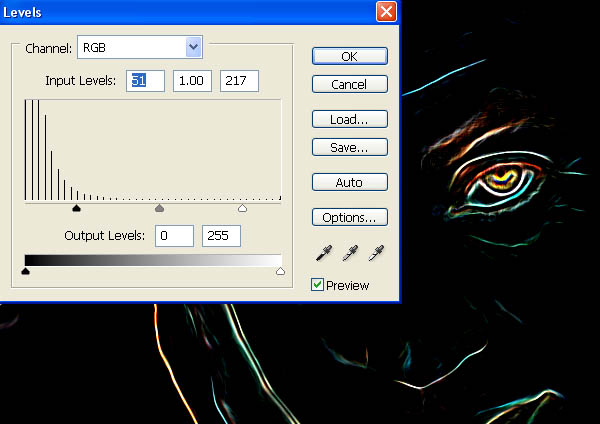
This next step is a stylistic choice as we’re going for a stylized look. However, if you want a more naturalistic finish you can skip this part. Select all the layers currently linked with “MAN.”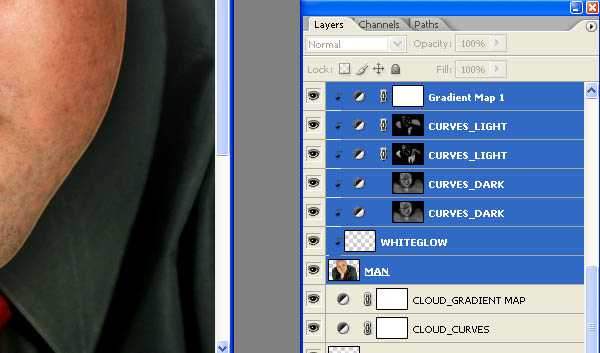
Step 11
Duplicate the “CLOUD” layer and drag it above the “GLOW_EDGES” layers. Apply a 2-3 pixel Gaussian Blur, then set the Layer Blending Mode to Screen and the Opacity to 50%. Take a soft-edged Eraser and delete all parts of the cloud that spill over the face and details. Duplicate the layer and drag it until you get a fairly even coverage of mist at the bottom of the image. Call these layers “CLOUD_BLURRED.”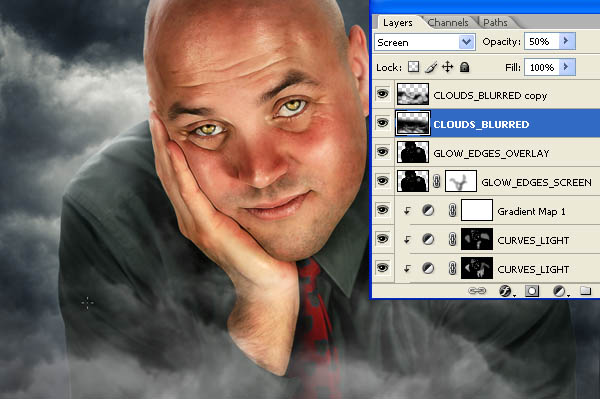
Step 12
Download the water drops 1 image from sxc.hu and open it. Go to Image > Rotate Canvas > 180 degrees. Erase the bigger ball of water and the broken balloon part.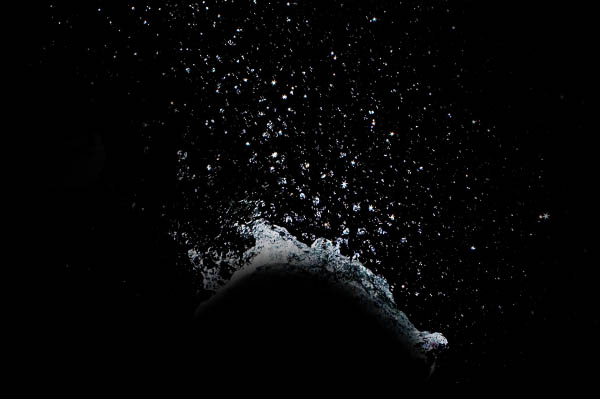
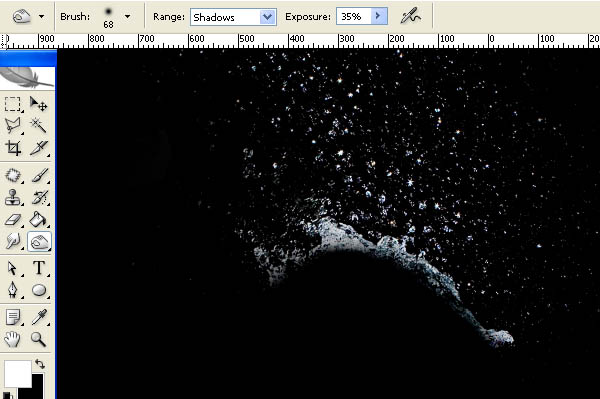
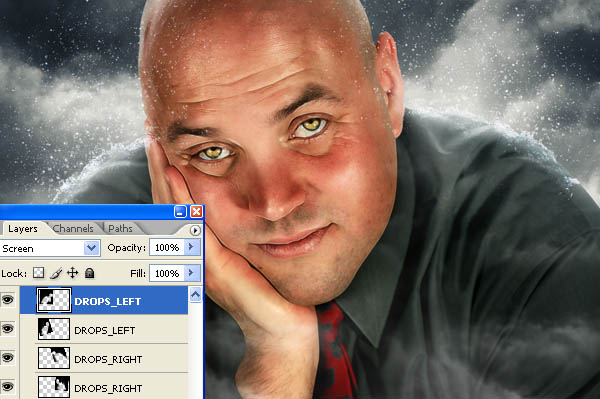
To get drops of rain, drag a duplicate and resize bigger. Make several copies until you get a good spread. Use the Clone Tool to get a more precise covering. Then group the layers, select the group and go to Layer > Layer Mask > Reveal all. Use this Mask to soften the impact of the rain, remove any drops covering detail and give it an overall clean up.
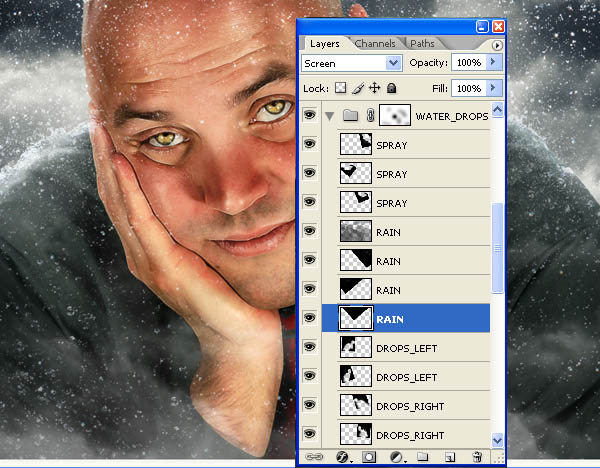
Step 13
Create a new layer directly above the “WATER_DROPS” group (the rain and stuff) and call it “STARBURST.” Fill it with 60% black and go to Filter > Noise > Add Noise and set up as shown below.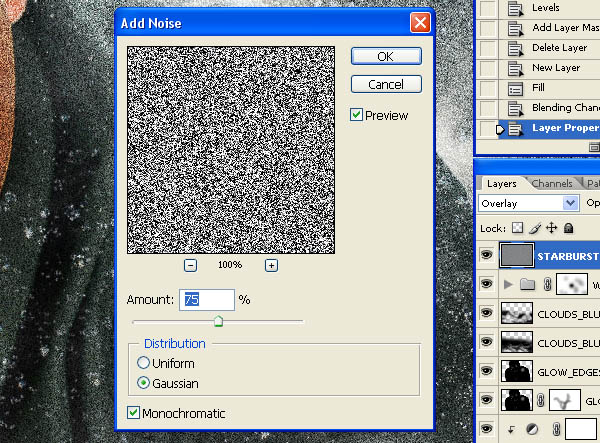
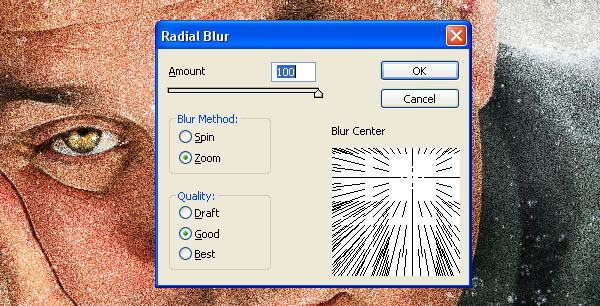
Step 14
Create a new layer directly above “STARBURST” and call it “FAKE_RAIN.” Fill it with 60% black, add noise (as you did for “STARBURST”) and then resize it.
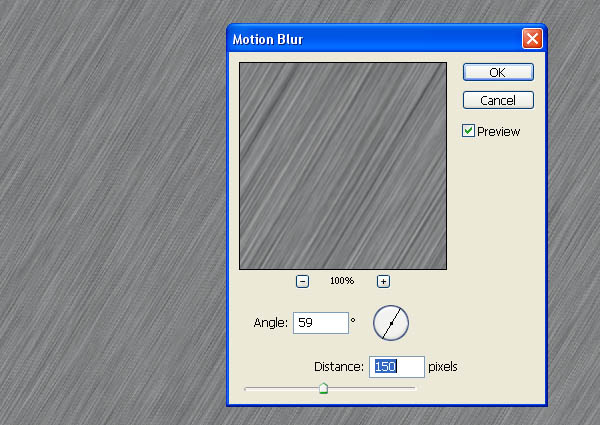
Step 15
Duplicate “FAKE_RAIN,” call it “FAKE_RAIN_BGROUND” and move it below the “VIGNETTE” layer on the layers palette. Rotate it 10 degrees or so and change the Layer Opacity to 75%.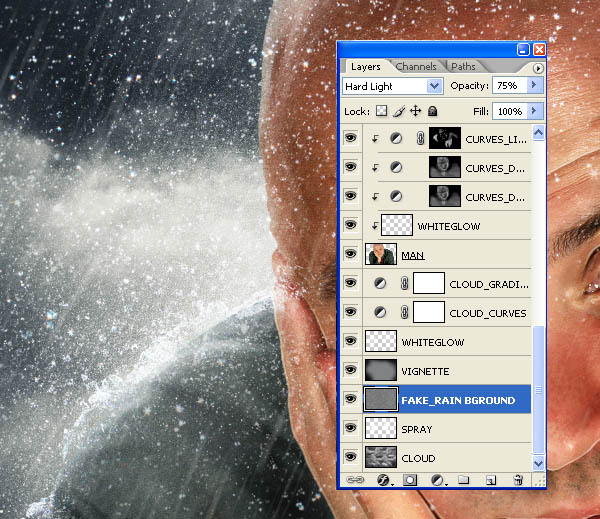
Step 16
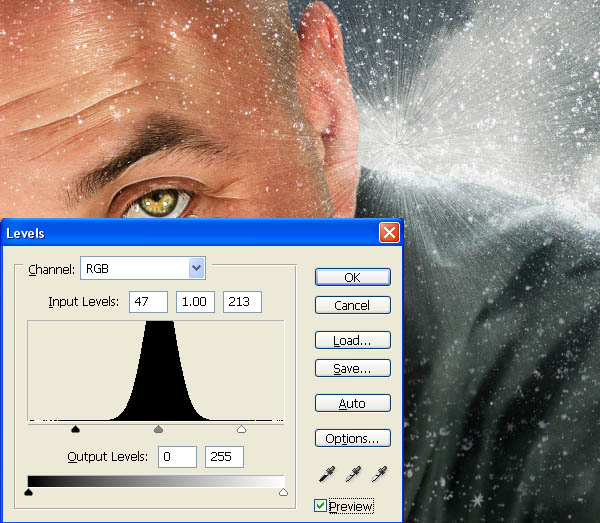
Create a new Gradient Map Adjustment Layer directly above “FAKE_RAIN.” Set the darker color as #075053 and the lighter color as white. Then set the Layer Blending Mode to Color with an Opacity of 55%. Add a Layer Mask (Layer > Layer Mask > Reveal All), grab a large soft-edged brush, load it with black, reduce brush Opacity to 20% and paint over the face area a couple of times.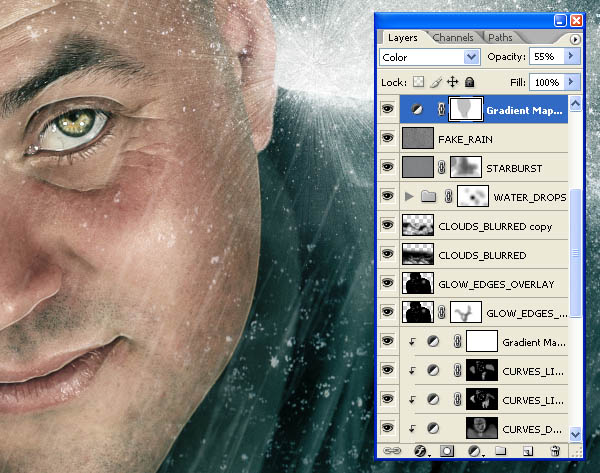
Step 17
Add a Hue/Saturation Adjustment Layer directly above the Gradient Map you just created. Pull the Saturation slider down to -68% and OK it. At this staged I added a Layer Mask and masked off some of the red tie using the a soft-edged brush at 25% Opacity.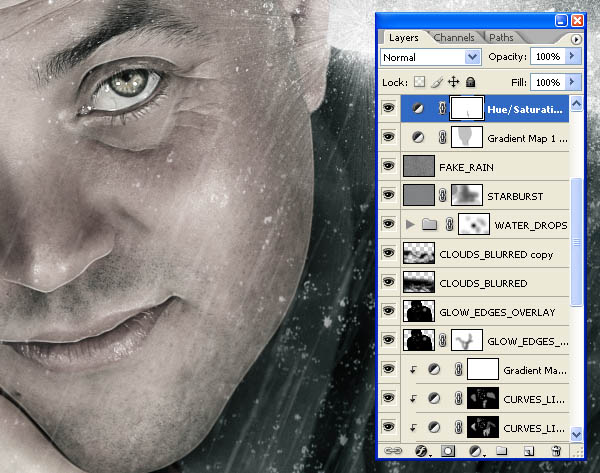
Step 18
Add a Curves Adjustment Layer above that and set up as shown below. It’s looking pretty moody now, time to add the finishers on this.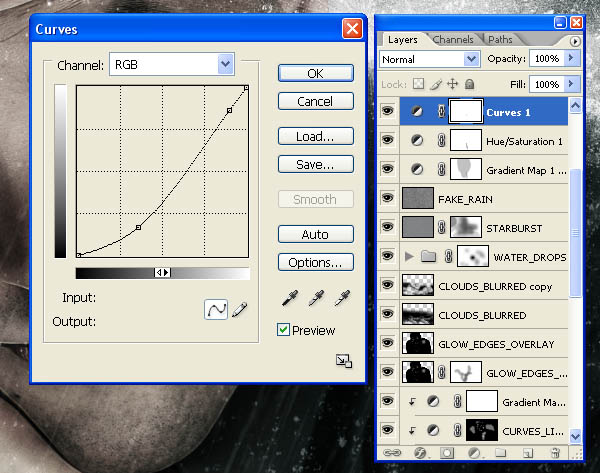
Step 19
Create a new layer above the three new Adjustment Layers and call it “OVERLAY_DODGE/BURN.” Fill it with 60% black and change the Layer Blending Mode to Overlay. Using the Dodge and Burn Tools we’re going to further boost some highlights and a couple of shadows.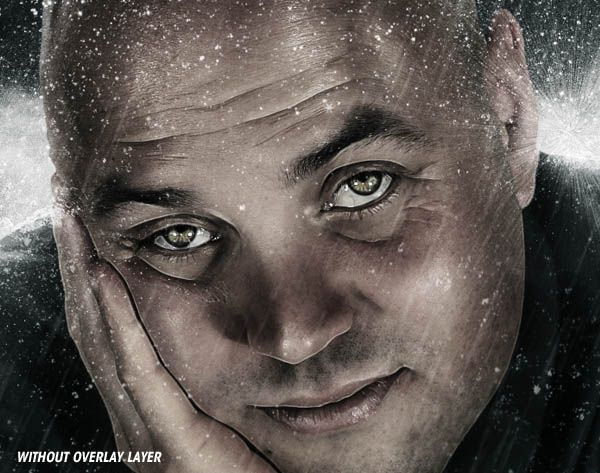
Step 20
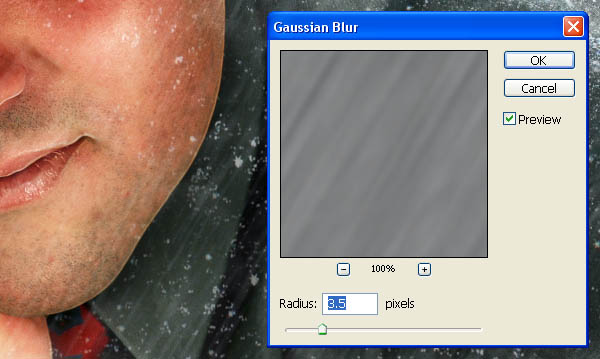
As a little salad garnish I’ve added a lens flare. Fill a new layer with black. Go to Filter > Render > Lens Flare and pick 105mm prime. The default settings should be fine. Set the lens flare Layer Blending Mode to Screen and position it above the shoulder. It’s worth mentioning that I also applied a small amount of noise, followed by a Gaussian Blur (around 4 pixels) and then a smart sharpen (around 150 at 7 pixels).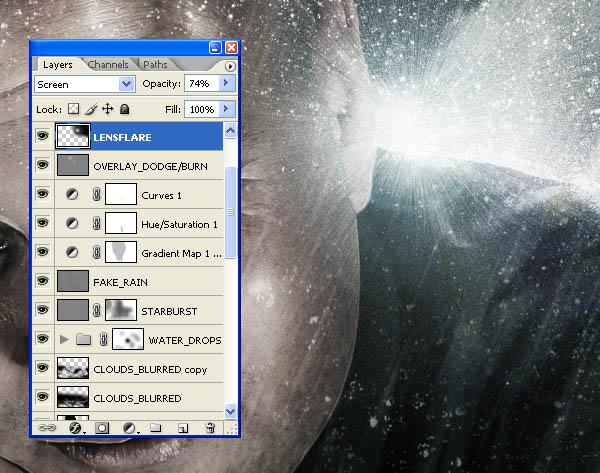
Step 21
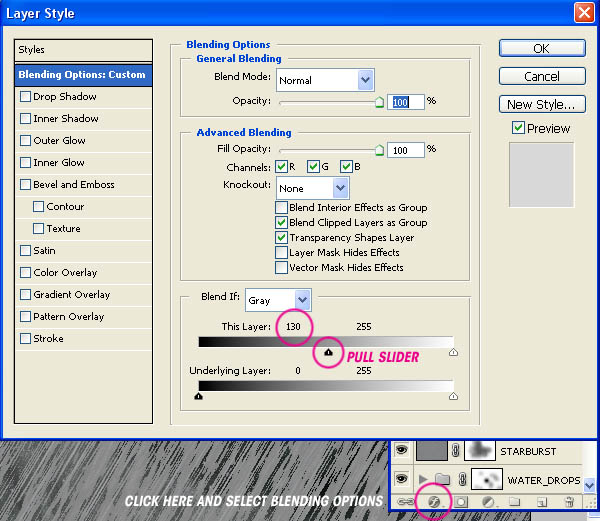
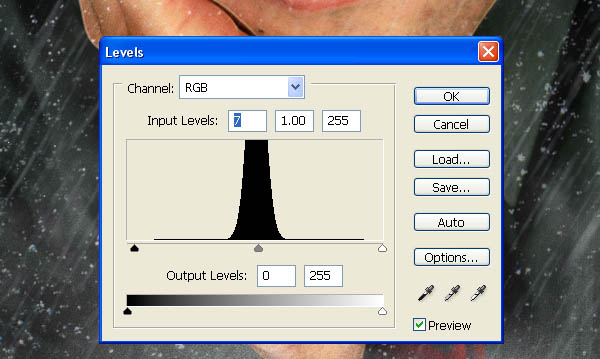
Select all of your layers and duplicate them. Merge all the duplicated layers into one, making sure you leave the originals untouched. Duplicate the merged layer and name one “HIGH_PASS” and one “INVERTED.” Select “HIGH_PASS” and go to Filter > Other > High Pass. OK a 2 pixel pass and then set the Layer to Overlay. Mask off any sections you feel are too strong, I did the starburst area a little.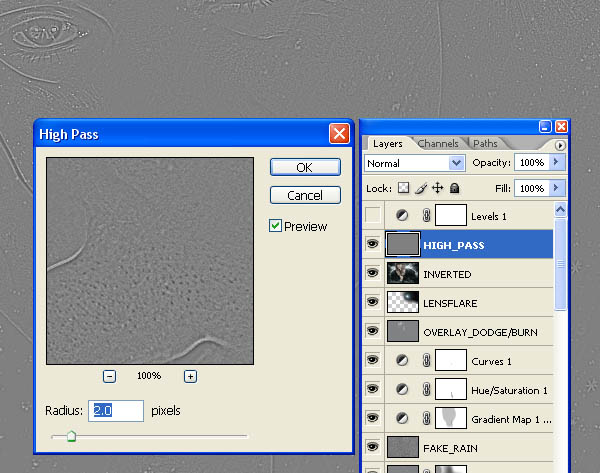
Step 22
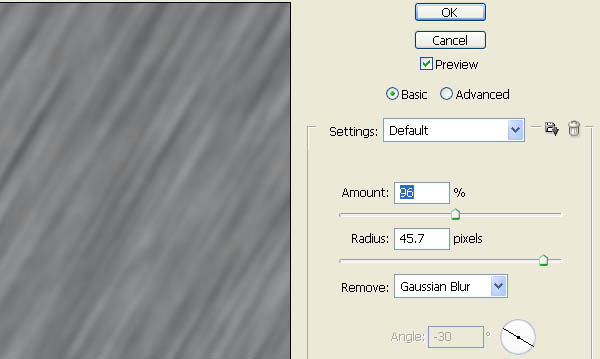
Select the “INVERTED” layer and desaturate it (Command + Shift + U). Then invert it (Command + I), apply a 40 pixel Gaussian Blur and then set the Layer Blending Mode to Overlay. It’s a little much so drop the Layer Opacity to around 45% or whatever you’re comfortable with.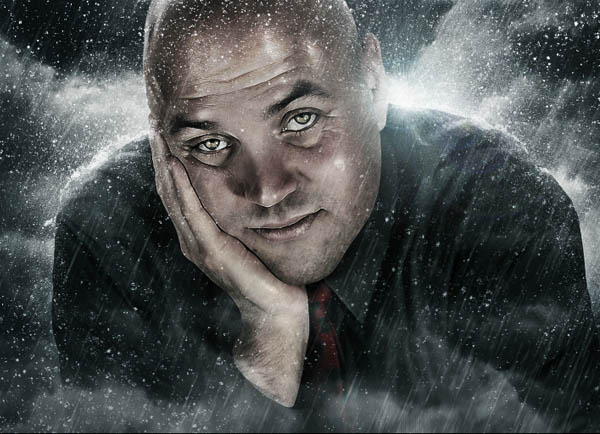
Conclusion
You should be left with a highly editable image. Adjust Layer Opacities, fine-tune Layer Masks, play with Adjustment Layers or even turn visibility of some of the layers off. Even without the rain and the clouds and whatnot, what you’re left with is a way to make portraits punchier. View the final image below or a larger version here.


0 comments:
Post a Comment